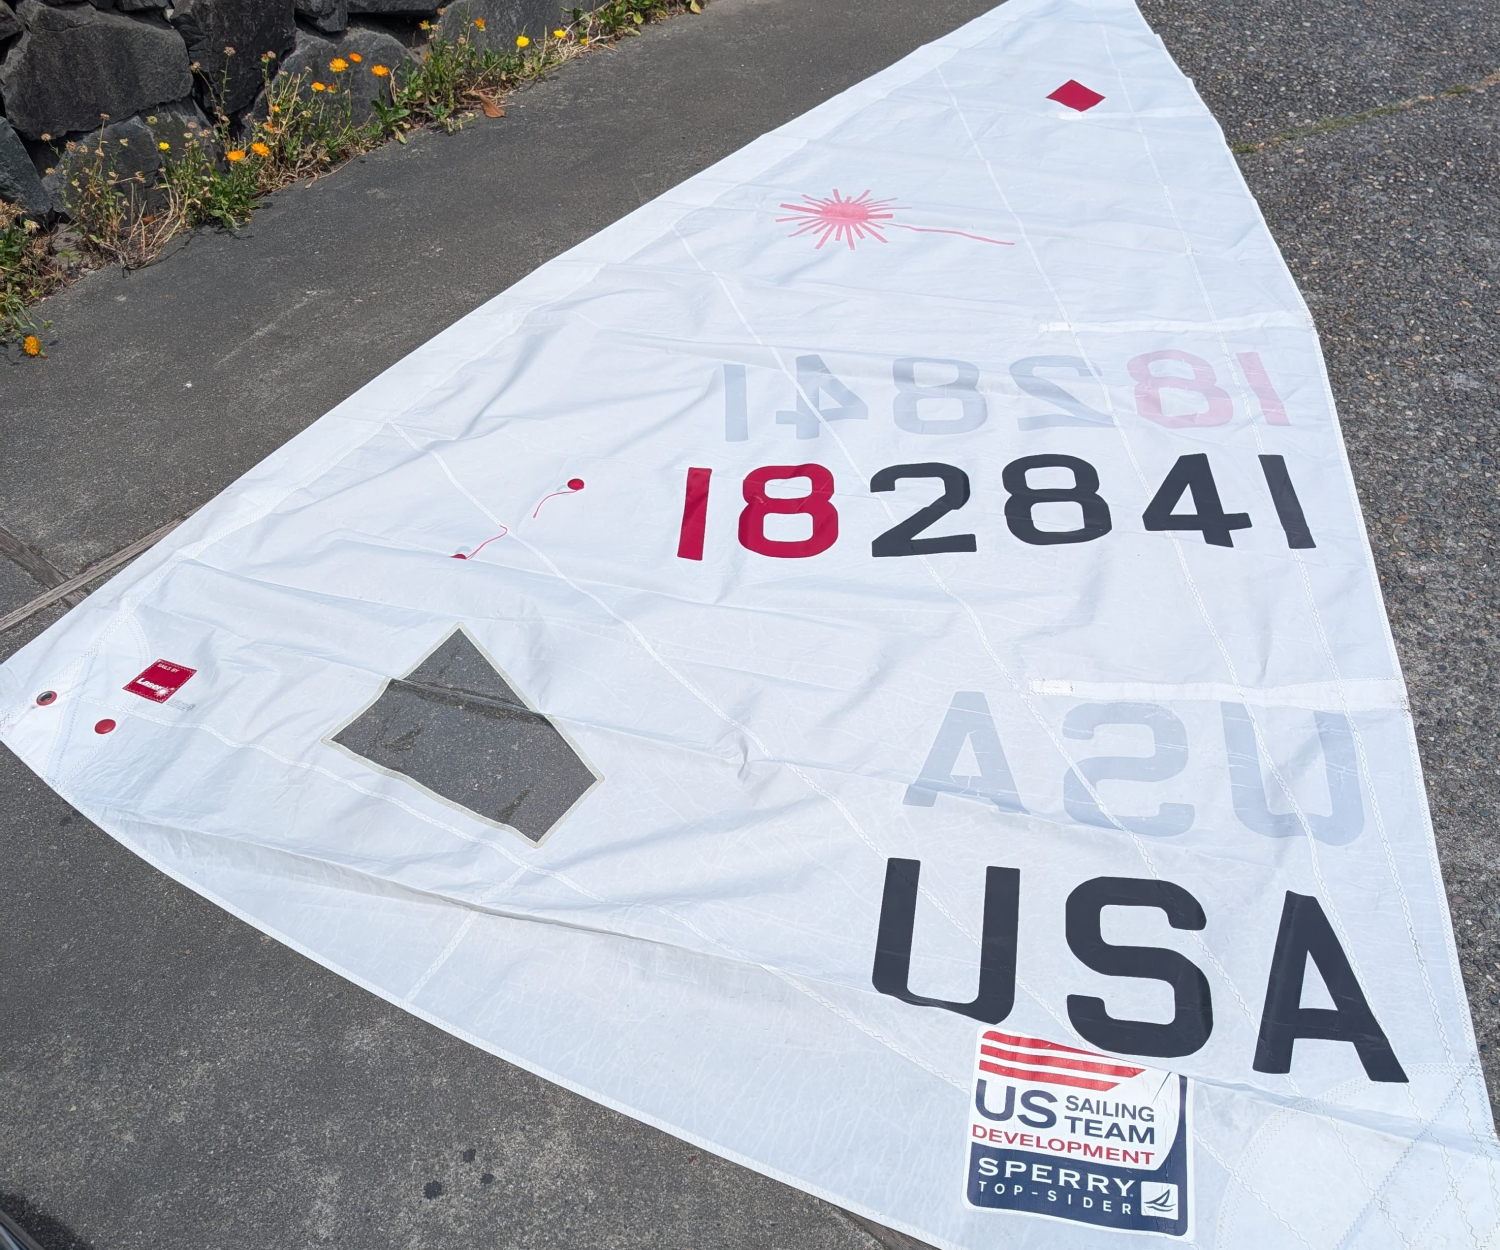
Chances are that at some point you will need to change numbers on a sail. Most of us buy one or more used sails along our sailor’s sailing career. New sails are only typically used at big and impactful events like National Team Trials, or International Competitions (e.g. North Americans). For our local sailing circuit NWYSC, a used sail in relatively good shape is more than enough.
Buying numbers and letters
ILCA numbers should be 9” in. height euro cut. I usually buy them from West Coast Sailing: 9” Euro Cut they arrive in 2-3 days in Seattle. Unlike other classes, you will need two different colors. The last 4 digits of your number need to be black, and all other numbers need to be red.
Remember that you need a pair of each (for each side of the sail), buy the 12” euro cut numbers - the digital version is not ILCA approved. You can cut your own numbers if you have the right fabric, but I don’t recommend it. You won’t save much money, and you will spend a fair amount of time getting the numbers right (they have shape and thickness rules).
So, if your number is USA 206526 (most are six digits long), you will need:
Two sets of 20 in red
Two sets of 6526 in black
Two sets of USA letters in black
I know, it’s strange. The ILCA rules state the following:
“Only self-adhesive, stick-on sail numbers and letters may be used. Each one shall be a single, solid color and easy to read. The last four numbers on both sides of the sail shall be the same dark color, preferably black. The numbers in front of the last four shall all be another, obviously different color, preferably red. National letters are only required at international events, and shall all be the same color.”
Other materials needed
To make it easier to work on the sail, I recommend the following items.
The new numbers and/or letters
A regular pencil - you will need it to write on the sail
A 48” straight edge ruler or yard-stick (we recommend this one) - you will use it to mark lines across the sail
A square ruler - you will need it to measure right-angle markings
A measuring tape with metric (if the yardstick does not have them) - you will need it to measure in CMs
A small bottle of adhesive cleaner - you will need it to remove the old numbers adhesive (e.g. Goo Gone, 3M Adhesive Cleaner)
I like using Goo Gone, it’s inexpensive, pretty effective, will not harm the sail, will not discolor the new sail numbers, and it’s a natural solvent made with orange peels. You can easily find it at any grocery store, Home Depot, or Lowes.
NOTE: Find a flat, clean, and firm surface to lay down the sail (not carpet), like an untextured concrete or wood floor. It’s important because you can not step on or put your weight on the sail if the surface below has any give; you will wrinkle the numbers. Tables are hard because the sail does not usually fit, and it’s easier to be on top of the sail.
The ILCA sail number rules
The class has very clearly documented rules. However, they are different depending on the sail size. However, the tolerances and spacing are the same.
All letters and numbers should be of a solid color, and all national letters should be of the same color
The class rules specify a MIN, but not a MAX. The MIN space between numbers or letters is 30mm, so measure a 40mm spacing to make sure any errors are still legal.
The space between a letter or number from the leech should be 100mm with a tolerance of +/- 12 mm. So, MAX space of 112mm and a MIN of 88mm. So, measure 100mm to the leach.
ILCA4 Placement
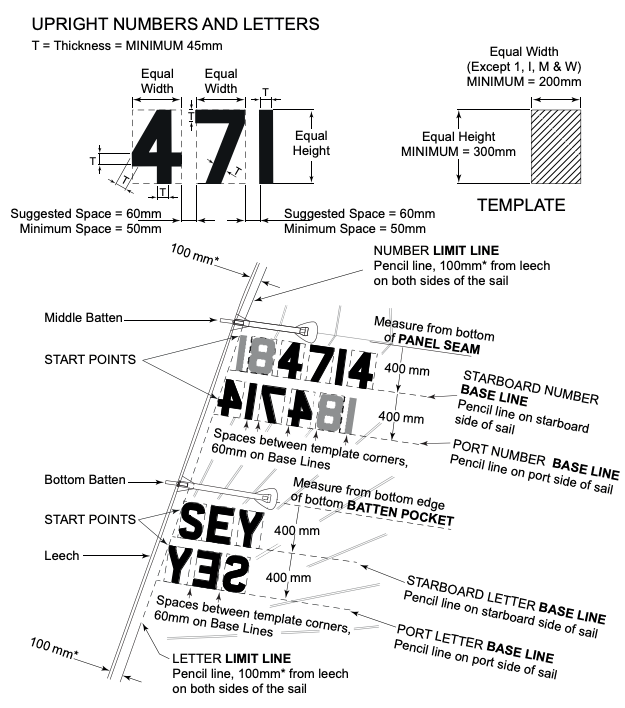
Notice that all numbers will be placed between the middle and lower battens. You can easily measure all distances from the top batten.
ILCA 4 Spcifications
ILCA6 Placement
Notice that the country letters go below the bottom batten and it’s tricky to measure the 100mm required between the leach and the number line.
ILCA 6 Specifications
ILCA7 Placement: MKII bi-radial cut
The ILCA class no longer considers the MKI sail class legal. So, it’s not really sold any more. Your sail is likely an MKII. If it is not, there are different rules for placing numbers. The instructions below are for the MKII sail. Notice that the class numbers will also go under the bottom batten.
ILCA 7 Specification
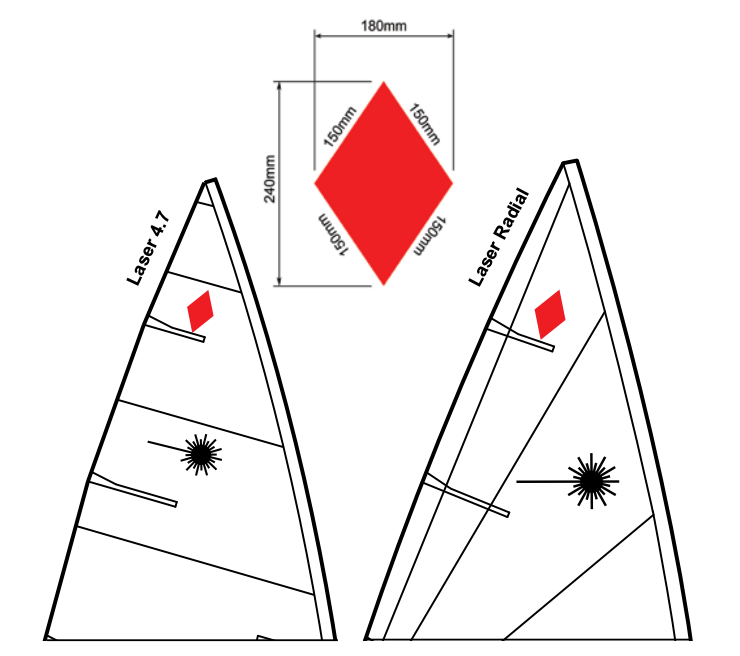
ILCA4 and ILCA6 Red Rhombus for Women’s events
The class may require a red rhombus be placed on the sail for world or regional championships, or events described as international events in the NOR or Sailing Instructions.
Women's Rhomboid Placement
Placing the numbers and letters
Start with the STARBOARD side
To make sure you are on the starboard side of the sail, lay down the sail with the LUFF (mast or front) to your right.
Mark the reference guide lines.
Using a pencil, mark a vertical reference guide line parallel to the LEACH (back of the sail) at 100 mm from the edge of the sail.
For ILCA4/6: Mark your guide line parallel to the BOTTOM EDGE of the MIDDLE BATTEN POCKET, go the full length of the straigh edge ruler.
For ILCA7: Mark your guide line parallel to the BOTTOM EDGE of the PANEL SEAM that cuts across the MIDDLE BATTEN, go the full length of the straigh edge ruler.
Mark the horizontal guide lines.
For ILCA4: Mark 4 horizontal guides 400mm from each other starting from the horizontal reference guide line
For ILCA6/7: Mark 2 horizontal guides 400mm from each other starting from the horizontal reference guide line
For ILCA6/7 mark the country reference guides.
You will need a second reference line marked from the BOTTOM EDGE of the BATTEN POCKET. Notice that this is different from the first reference line.
Mark 2 horizontal lines at 400mm from each other starting below the horizontal reference line.
Place the STARBOARD sail numbers.
Place the FIRST number along the 1st horizontal guide and move the number towards the edge of the sail until the upper left edge (or corner) of the number intersects with the vertical guide parallel to the LEACH
Using the aquare ruler mark another perpendicular line 35mm toward the LUFF (front) of the sail. The regulation distance is between 30 and 40mm or 35mm +/- 5mm.
After placing the number mark the spacing to the next number and repeat with the rest of the sail numbers
Mark the STARBOARD letter guidelines.
Mark another vertical guide line parallel to the LEACH (back of the sail) at 100 mm from the edge of the sail.
Mark another reference horizontal guide line parallel to the BOTTOM EDGE of the BOTTOM BATTEN POCKET, go the full length of the straigh edge ruler.
Mark two more guide lines 400mm from each other starting from the reference horizontal line of the bottom batten
Place the 1st country letter.
Starting on the LEACH side of the sail under the top batten, pleace the first letter “U” along the horizontal guide making sure the upper left corner of the U is at the intersection of the Vertical and Horizontal reference lines. Its marked at the START POINT on the ILCA diagram.
It helps to trace the corners of each letter with a pencil on the sail before exposing the adhesive
Only remove the adhesive as you place the letter avoiding any air bubbles. It’s much harder if you remove the whole adhesive backing
Mark the spacing between letters and place the rest of the letters.
You need to do this one letter at a time, because the letters are different widths. Always mark the distance after you place the letter.
Use the straight ruler to mark a line perpendicular to the horizontal guide at the end of the widest part of the letter you placed
Using the straight ruler mark another perpendicular line 35mm toward the LUFF (front) of the sail. The regulation distance is between 30 and 40mm or 35mm +/- 5mm
Place the “S” letter using the 1st horizontal guide you placed and the perpendicular line. Make sure the widest part of the letter aligns with the perpendicular distance line
Repeat the process for the “A”
Place the women’s RHOMBUS, if needed.
The rhombus should be placed directly above the top edge of the right pocket of the top batten
Finish with the PORT side
Flip the sail so the LUFF is on the left hand side. You should be bale to see the numbers and letters on the port side, but you may not be able to see your reference lines. If so, you may need to mark the reference lines again.
Place the STARBOARD sail numbers
Place the LAST number along the 2nd horizontal guide and move the number towards the edge of the sail until the upper left edge (or corner) of the number intersects with the vertical guide parallel to the LEACH. Remember you need to place the numbers in reverse order to read the same number.
Using the aquare ruler mark another perpendicular line 35mm toward the LUFF (front) of the sail. The regulation distance is between 30 and 40mm or 35mm +/- 5mm.
After placing the number mark the spacing to the next number and repeat with the rest of the sail numbers
Place the 1st country letter
Starting on the LEACH side of the sail under the bottom batten, pleace the LAST letter “A” along the 2nd horizontal guide making sure the upper left corner of the “A” is at the intersection of the vertical reference line and the 2nd horizontal guide.
It helps to trace the corners of each letter with a pencil on the sail before exposing the adhesive, or use some tape to keep the letter from moving.
Only remove the adhesive as you place the letter avoiding any air bubbles. It’s much harder if you remove the whole adhesive backing
Mark the spacing between letters and place the rest of the them.
You need to do this one letter at a time, because the letters are different widths. Always mark the distance after you place the letter.
Use the straight ruler to mark a line perpendicular to the horizontal guide at the end of the widest part of the letter you placed
Using the straight ruler mark another perpendicular line 35mm toward the LUFF (front) of the sail. The regulation distance is between 30 and 40mm or 35mm +/- 5mm
Place the “S” letter using the 1st horizontal guide you placed and the perpendicular line. Make sure the widest part of the letter aligns with the perpendicular distance line
Repeat the process for the “U”
Place the women’s RHOMBUS, if needed.
The rhombus should be placed directly above the top edge of the left pocket of the top batten